How to Point-and-Shoot: Snakes!
It has been a long journey with my ever handy point-and-shoot camera. Not just in the number of days or places visited, but in number of pictures taken as well. It has been bruised and tortured in extreme climes – from the hot, humid forests of Western Ghats to the freezing cold of southern Ontario. It has been dropped on solid ground, splashed by river and rain, and been subjected to blowing sand. One day the lens cap fell into a waist-deep swamp, and after spending an hour looking for it, I had to forfeit. Albeit of all these unfortunate accidents, it is a great companion on adventures. My camera is one brilliant Sony DSC H7 that now wears a yellow plastic bottle cap as a lens cover. And I am glad I still own it!
It will be its fourth anniversary this year, and to commemorate that, I have decided to write articles on subjects I photographed using this camera. Wanderer’s Eye has always focused on the photographs, but never on how they were taken, this is another reason why I am writing this article. There will be many more to follow, mainly focusing on how to photograph flora and fauna using a point-and-shoot camera. These articles will not dive deep into the technical particulars of how to make a photograph, but it will be a general guide that will consider the basics of photography and ethics of point-and-shooting wildlife.
I will be starting with photographing snakes in the wild, and share the little experiences I have had with this subject. To begin with, one must have the knowledge and understanding of snakes. It is wise to know how to distinguish a venomous snake from a non-venomous one. They are very unpredictable in behaviour, capable of killing a person or causing a severe allergic reaction if bitten. Handling snakes requires skill and agility, but it also depends on the species and the mood of the snake. For instance, handling a Garter Snake is much easier than handling a similar sized Viper, and although both are equally likely to bite, a Viper’s bite can be fatal. In order to handle snakes, you need to be trained as well. There are many courses that teach how to carefully handle snakes. This article is only for those who have been trained to handle snakes, if you aren’t, always photograph a snake from sufficient distance – whether it is non-venomous or venomous. Safety first!
When it comes to a point-and-shoot camera, photographing snakes can be quite challenging. To be able to photograph a snake, the photographer has to be quick, but point-and-shoots are pretty slow in focusing as compared to DSLRs. The focus is also set to a fixed position; hence any movement by the snake can destroy a photograph. It also depends on the weather conditions – a sunny day is always better to photograph snakes, because you can use a higher shutter speed at a lower ISO (less noise) to capture the flicking of tongue. If the weather is dull and dark, it becomes difficult to photograph the flicking of tongue, since you will have to go on a slower shutter speed at a higher ISO, which leads to higher noise. From my experience, it is always better to photograph under ISO 400. I use ISO 80 to 200 under ideal conditions and rarely 400 or above. Although ISO 80 or 200 is quite dark, if you are using a flash, it works perfectly well and produces minimum noise. But use of flash in snake photography makes the capture of tongue flicking action difficult, if not impossible. In order to capture it, turn on the “Burst frame” mode to be able to take multiple pictures within a few seconds. The Burst mode is pretty slow in point-and-shoots compared to DSLRs, but they work perfectly well in capturing the tongue flick. Throughout the post I will give some suggestions on what to do if you see a snake through your point-and-shoot camera.
My first ever excursion to photograph snakes was at a hill-station called Matheran. We were out exploring the monsoon fauna in search of the elusive and elegant Vine Snake. Only a trained eye can spot this snake in the lush green undergrowth of monsoon. It sat unstirred, almost invisible, until a hand approached and grabbed it gently. It is undoubtedly the most beautiful snake I have ever seen. There was a burst of shutters clicking all around it, and I got my first shot of a snake that turned out utterly badly. When I think back, the conditions to photograph this near-fluorescent snake were quite difficult. The day was too dark and the snake too wet. All the photographs I managed overexposed the snake against a pitch dark background. I was disappointed, but nonetheless the lesson was learnt.
After a year, I bought my first digital camera – the Sony H7. I set out again to photograph this snake, and came home with satisfied results. It has been four years since, and I photographed Vine Snakes on several occasions, but then I came face-to-face with the largest I had ever seen, at Anshi National Park. This time though, I was alone, which made photographing the snake quite fun. There’s something about photographing a snake with no one for assistance. It is an exciting moment, very wild and impulsive. I have always been inspired by Austin Stevens and his photography expeditions into the wilderness to photograph deadly snakes. Well, this is the closest I could get to photographing snakes.
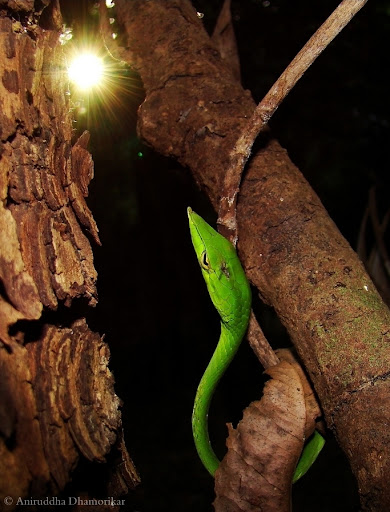 |
| Vine Snake, Ahaetulla nasuta Exif: 10/1250sec F2.7 ISO80 at 5.20mm |
Like many snakes, Vine Snakes are somewhat predictable. Many snakes, if cold or have recently eaten, will be slow and docile, whereas, if they have been basking in the sun for ample amount of time, they will be swift and aggressive. Vine snakes coil into an ‘S’ shape and puff their bodies if agitated. They will expose their inter-scales on the neck and make a hissing sound. This is also a sign that you’re likely to be bitten. Fortunately, the snake I came across was in a hurry to be bothered by my presence and crawled on another tree as I photographed it.
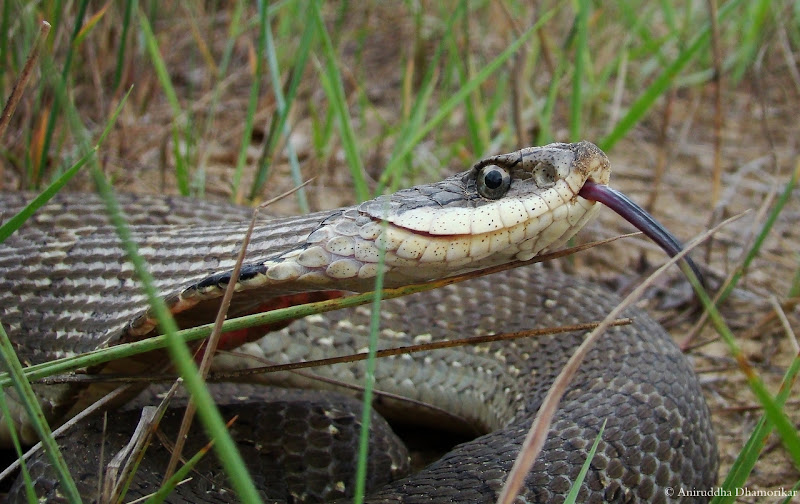
On many occasions in Canada, I have come across countless Eastern Garter Snakes, and always tried to get that right photograph where I can say, yes, this is it! Although I took many photographs, the one in particular I like most, which also happens to be the one I dislike the most, is the one displayed below. I like it for several reasons: the snake is looking at the camera, the tongue is flicking, I can be seen photographing the snake in its eye which adds a perspective of how the photograph was taken, and the background isn’t too bright on eyes. It is also bad, because the focus has shifted to the back of its head, hence the eye and the tongue look soft, and the background isn’t too smooth. This is the best example that shows what all to consider while photographing snakes.
It is much easier to photograph snakes while someone trained handles them, since you get to move around freely to get that prefect background, as well as think about various compositions. But when you’re one-on-one with a snake, you have to be quick and alert, and be officially trained to handle snakes. You do not want the snake too close to you, and at the same time photograph it up close. While managing the snake and the camera, it becomes difficult to get a good background, especially if the snake is uncooperative. I always make sure that I do not carry the snake elsewhere to get a better photograph, because I do not want to change its original location for reasons such as: it might be on the trail of a prey, or looking for a mate, or going back to its nesting ground. Hence, always make the most of it then and there itself in a few minutes, or if you do change the location, make sure to release it back where you found it. Also, many photography opportunities arise while rescuing a snake. Such photographs only serve the purpose of a proof that the snake was in that location. Always make sure the snake is rescued first. Snakes are well aware of their surrounding, and when there is a snake, say, in your house or apartment complex, there is always chaos around. This triggers the fight-or-flight mode of the snake, driving it to madness (stress) – which can result in its death. Hence, always use a dark bag to contain a snake, and then release into the wilderness. You might have the opportunity to photograph the snake then. This is a good ethic to follow that makes us better naturalists and not just mere photographers.
 |
| Eastern Garter Snake, Thamnophis sirtalis sirtalis Exif: 10/4000sec F4.0 ISO200 at 10.40mm |
Last summer, I was assisting researchers with mapping and tracking Eastern Hog-nosed snakes. This gave me the opportunity to photograph these snakes in their habitat. Eastern Hog-nosed snake is often mistaken for Massassauga Rattle snake or even a Cobra, hence people who don’t recognize these docile creatures kill them. This is one of the many reasons, besides habitat loss, why the Hog-nosed snakes are now considered a species-at-risk. This also means that if you find one, you cannot keep it, or if you stumble upon its nest, you cannot destroy it, but many do because they are utterly ignorant.
The first Hog-nose snake I saw was coiled up deep in the thickets. The weather was cold and wet; hence the snake must have decided to stay well hidden from predators and the cold. It was on a bright sunny day that I got my first photograph, and thence I photographed them for over two months, trying for that perfect shot that I would be most satisfied with.
 |
| Eastern Hog-nose Snake, Heterodon platirhinos Exif: 10/1000sec F4.0 ISO200 at 9.70mm |
One must consider all the different ways in which to photograph a snake. Although I photographed the Eastern Garter Snake in my hand, it is not “natural” to see the snake hanging from the air. Such photographs are especially better if you want to capture the abdominal scales, or need to make a different composition. But you should also consider the natural habitat and pose of a snake. This makes the photo look truly natural and gives a sense of being in the wild, and not in some controlled environment, because when we are out in the wild, the snake is the master and we must adapt to photograph it.
Once you have read about the snakes, your next goal is to find which snakes are found in your area. By doing so, you will be prepared to identify the snakes you stumble upon. You will also know if it is venomous or not, and then, without spooking it, go for the photograph. There is another challenging way to photograph snakes – without touching them. In Canada, I came across this beautiful, large, formidable-looking yet docile Eastern Fox Snake (also a species-at-risk) which I have discussed previously. This snake was always out on a sunny day, and gave me a chance to photograph without having to touch it.
To photograph a snake without handling it is challenging, but if the snake is basking, it is likely that it is least bothered by your presence. By moving around slowly and carefully, you can approach close enough without disturbing the snake. Once I managed to close-in only a few feet from a Fox Snake that was basking in the open. Had I moved around too fast, or stood up right in front of it, the snake would have retreated in its burrow. Keeping a low stature and then slowly but carefully approaching usually works. Also, always photograph a snake from comfortable distance at first – so that you at least have documented a photograph of it, only then start getting closer for a better picture.
On a similar instance during a nature-walk in 2009, I spotted a Bronzeback basking in the canopy just beside the path. This is an arboreal snake known for its swiftness. Capturing it for photography was difficult; hence I decided to photograph it from where it was. Since the snake did not notice me, I had a few minutes to change the setting on my camera before it headed elsewhere. In such cases, it is important to think before you run after a snake, for they might not outrun you but disappear in such a place that you will miss your opportunity. Always move slowly when you spot one. Most often, the snakes will not consider you a threat and will not vanish from your sight.
 |
| Eastern Fox Snake, Elaphe gloydi Exif: 10/8000sec F5.0 ISO80 at 78mm |
 |
| Bronzeback, Dendrelaphis tristis Exif: 10/1600sec F4.5 ISO80 at 76.30mm |
When it comes to venomous snakes, I have the least experience in dealing with them. The closest I have come to photograph a venomous snake is a Bamboo Pit Viper and a Russel’s Viper. Although Bamboo Pit Viper’s venom is not lethal to humans, it can cause a severe reaction if injected. During a trip to Matheran, we found a small Bamboo Pit Viper a foot high from the ground. It started moving upwards after sensing our movement, and went and stopped at about a meter from the ground. Since the morning was cold the snake pretty docile, I had the opportunity to photograph it from various angles. One of the parts of a Pit Viper you don’t want to miss is the heat-sensing pits. In fact, this was my only focus of photographing a Pit Viper that day.
After several attempts, I was face-to-face with the snake, and kept safe distance so that it couldn’t bite me, it was also the most cooperative of vipers, and I after got my shot, the snake was left alone on its favorite tree. Visit here to read the full account of snakes photographed at Matheran. If you find a snake, always estimate its size by comparing it to an object, such as a pen, to have it on the record. Also aim to photograph the entire body of the snake for future references, and, if possible, special organs such as the head, eye, the tongue and the body pattern of the snake.
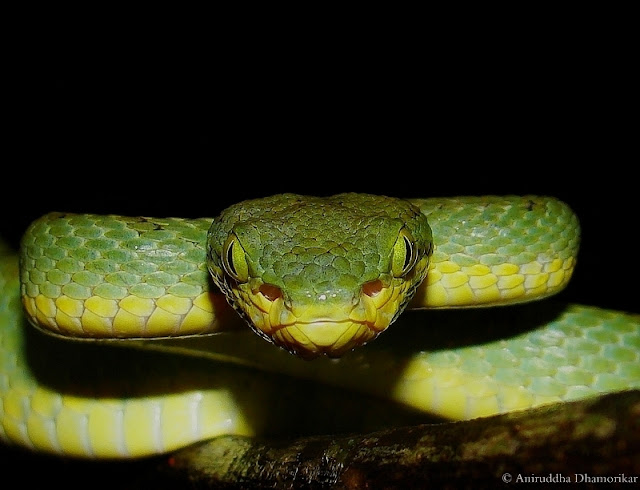 |
| Bamboo Pit Viper, Trimeresurus gramineus Exif: 10/1600sec F4.5 ISO80 at 11.60mm |
Let’s take a look at what all to do, if you are an amateur photographer carrying a point-and-shoot or an entry level DSLR to photograph snakes, assuming you know which snake it is, and how to handle it.
P A background can make or break a photograph. Always consider factors such as direction of the sun – to get proper light on the subject, and the clutter in the background – cleaner the background, the better. Most point-and-shoots have decent zooms (above 5x); make full use of it, because a higher zoom yields a smoother background which makes the snake stand out.
P Use a lower F-number (higher aperture) to get a better depth-of-field, but higher the aperture, shallower the depth-of-field, hence only a narrow portion of the snake will be in focus (as in picture 2, the garter snake); but the background will be sufficiently blurred; whereas, lower the aperture (higher F-number) may produce a busy background, hence position yourself such that the distance between the snake and the background is more than the distance between you and the snake (as in picture 5). You will need to determine the minimum focal distance of your camera. It is usually written on the lens or the manual, but you can easily estimate where you should position yourself while taking a photograph. I keep a distance of about 10 to 15 feet while photographing using 15x zoom.
P Use of flash plays an important role in photographing snakes – especially on dark days and during nights. I always keep the intensity of the flash from low to a minimum (-2.0EV to -0.3EV), coupled with a homemade diffuser, and adjust the shutter speed and ISO accordingly, so that that snake’s scales do not reflect too much of the light nor does it harm the eyes of the snake. A slower shutter speed at a lower F-number with ISO set to less than 400 gives excellent results under dark conditions.
P If you are dealing with an aggressive snake or are not sure about its identification, it’s better to photograph it from a distance. Ideally, a 15x zoom works perfectly well under such situations. You might have to move around without disturbing the snake, to make a better composition.
Remember, the snake dreads you more than you fear it, hence always be careful not to disturb it. If it is a hatchling, it is better not to touch it at all, since they are the most easily agitated, and can damage their backbone if mishandled which may result in a deformity or death.
Although our society has advanced over decades, many of us still carry old, superstitious beliefs regarding snakes, hence documenting snakes through photography is very important in today’s times. Educating masses through photography is a step closer towards making them change their false beliefs. It is one of the most efficient ways to make people aware of the benefits of having snakes that prey on rats around our backyards. It is also a great tool to inspire many to express their fondness for the natural world, and perhaps get them interested into herpetology.
Again, make double sure while photographing snakes that you have the identification right. Do not risk handling a snake you are not familiar with. I have seen many excellent photographs of snakes without any knowledge about them, this can be very risky and it may cost your life. If you miss the opportunity to photograph a snake, accompany a snake expert next time and have fun shooting!
That last photo of the bamboo pit viper is superb!
ReplyDeleteThank you Ted!
ReplyDelete